ASP.NET Web API is a framework provided by the Microsoft with which we can easily build HTTP services that can reach a broad of clients, including browsers, mobile, IoT devices, etc. ASP.NET Web API provides an ideal platform for building RESTful applications on the .NET Framework.I hope these questions and answers will help you to crack your Web API Interview. These interview Questions have been taken from our new released eBook ASP.NET Web API Interview Questions.
This eBook has been written to make you confident in Web API with a solid foundation. It's would be equally helpful in building REST API using ASP.NET Web API and integrating it with your real projects.
Recently we’ve started using the Web Components API for Onsen UI. The API gives the developer the power to create new tags and extend the HTML vocabulary. We’ve rewritten some of the simpler Onsen UI components as Web Components but we’re not going to stop at just that. The goal is to rewrite the core functionality of Onsen UI as Web Components and provide Angular 1.x support in the form of wrappers.
The reason why we’re doing this is that we don’t want the Onsen UI components to be usable only for AngularJS developers. We want you to be able to use Onsen UI regardless if you’re a Angular 1.x, React.js or a jQuery developer. We’re very excited about the upcoming Angular 2.0 as well which is built on top of Web Components standard.
In this tutorial we we’ll take a look at the API and implement a simple component. Let’s learn Web Components while making a “favorite button” / “favorite star”!
The code for the component in this tutorial is available here.
What are we going to make?
The component we’re going to implement is a “favorite star” / “farorite button”. You know the kind of star that can be found all over the web and you can click to show that you like something.
This kind of star:


The two greatest powers of Web Component API is simplicity and abstraction. The implementation is encapsulated inside the custom element so the developer using the tag won’t have to care about it. Using the tag is as easy as going:
<favorite-star></favorite-star>
Just by doing this we get a nice that our users can click. If, instead, we want the to be golden, we can do like this:
<favorite-star active></favorite-star>
Let’s get to it!
First we need to create our tag. To register a new tag there is a new function called
document.registerElement(). It takes a tag name as well as a parameter object as arguments. The parameters can contain a prototype object that defines the behavior of the element.
window.FavoriteStarElement = document.registerElement(

    'favorite-star',

    { prototype: proto }

);
Since we are extending the HTML vocabulary, it makes sense to extend the prototype of the
HTMLElement object:var proto = Object.create(HTMLElement.prototype);
The <template> tag
The
<template> tag is used to encapsulate HTML so it can be reused in several places in your app. We put our style definitions and the inner HTML of the element here. In our case the inner HTML is just a <span> tag with a UTF-8 ★ inside it.
Please see the complete file for the style. It defines the colors and the “bounce” animation.
The Shadow DOM
One of most confusing parts of the Web Components specification is the Shadow DOM. The Shadow DOM is a subtree with special properties. It can be seen as a part of the DOM that is separate from the rest of the page. The styles that are defined inside the Shadow DOM don’t affect the rest of the page.
This is very good when creating custom elements since we can define our classes and styles without having to worry that they will have side effects. To create a new Shadow DOM tree the
element.createShadowRoot() is used.
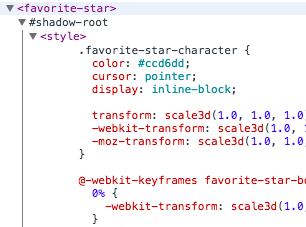
Chrome already has support for the Shadow DOM so when inspecting with the DevTools it will look like this when you find a Shadow DOM root:

Life cycle callbacks
For Web Components there are four callbacks that are executed during the life cycle of the custom element. They can be defined in the prototype. The most important is the
createdCallback which is executed when (you guessed it!) the element is created.
There are also two callbacks called
attachedCallback and detachedCallback that are executed when the element is added to or removed from the DOM. These are good for registering and destroying event handlers as to avoid memory leaks.
Finally, there is a callback called
attributeChangedCallback. As the name implies it will be executed whenever the value of an HTML attribute is modified. This gives us the power to react to changes made from outside the element, e.g. when the developer uses element.setAttribute() or element.removeAttribute().
We start by creating the
createdCallback for our component:
We need some custom behavior for when the user hovers over the star as well as when it’s clicked. The event handlers are registered in the
attachedCallback and removed in detachedCallback.
Finally we need to add a
attributeChangedCallback since we want to have correct behavior when the attribute is changed programatically.Conclusion
As of today there is still not universal support for these APIs. However, since we can add the functionality using polyfills we feel that Web Components are mature enough to use in a production environment.
We mentioned it earlier but I think it’s work mentioning again. The current incarnation of Onsen UI is using Angular 1.x directives to define the custom elements. With the Web Components API we get a new way to define custom elements that is more powerful so we decided to use that instead. We still love AngularJS 1.x however so we will keep support in the form of wrappers.
By rewriting the components using Web Components we get into a good position to extend the support to other frameworks. With Angular 2.0 in the horizon this is something we are very excited about!
Please continue supporting Onsen UI. If you have any questions about the content of this blog, feel free to drop a comment below.


1 Comments
ReplyDeleteimpressive thank you for share information
Web Api Interview Questions
OSPF Interview Questions And Answers
Python Interview Question And Answers